
How to Get Started Creating Video Content for Your Business
While filming a recent video project, I made a new connection. He saw that I knew a lot about video, so he wanted to have a chat and ask me a few questions. The conversation boiled down to this: “I have this idea. I want to create video content, but I'm not sure how to get started." All he needed was the basic framework. He didn’t care if it was perfect; all he wanted to do was get started. So if you have the desire to make videos but are putting it off or just don't know where to begin, this post is for you.
The most important thing you need to know
Starting is undoubtedly the most challenging part. Consider how a train begins its journey: slow and laborious at first, but once it builds momentum, it can continue for a great distance without stopping. The lesson here is simple: just start. Don't worry about having the best equipment or looking foolish in front of others. Just take that first step! You'll quickly find that with each video you create, the process becomes easier and the results improve.
The basic equipment you will need
The great thing is, you won’t need much to get started. It can be as simple as placing your phone in front of a window (so you look nice) and hitting record. But let's say you're in a professional setting and want the quality to be a bit above average. Here are the basic things you'll need:
A video recording device
This could be a phone or any type of camera. At this stage, the specific camera isn't super important. A common misconception about video quality is that the camera is everything. While it does play an important role, the lighting and how the audio is recorded are equally essential.

Basic lighting setup
You're going to want to invest in some form of lighting for your videos. Your choice will depend on the space available and whether you film on the go or are mostly in the same spot, but I'll recommend a few options down below. Consider using lighting with some form of diffusion, like frosted glass or a white sheet. This can soften the light, giving your face a more youthful and pleasing appearance.

MOUNTDOG Softbox Lighting Kit

Obeamiu 5600K USB Studio Lighting Kit

NEEWER 700W Equivalent Softbox Lighting Kit
An audio recording device
You could record the audio directly from the video recording device you are using, but the problem is that it's often too far away to capture clear sound. Based on your specific situation, there are three different types of microphones I would recommend.

Sitting in front of a computer
If you'll be making videos in front of your computer and won't be moving around much, then a tabletop microphone like the Blue Yeti USB Microphone would be a good choice. It's simple, budget-friendly, and easy to use.

Sitting and moving
If you anticipate moving around a bit while recording, it might be beneficial to get a tabletop-style microphone like the Blue Yeti shown above, mounted on an "arm" that can be clamped to your desk. The Microphone Stand for Blue Yeti, allows you to adjust the microphone's position depending on where you are sitting. It's also a suitable option for podcasting, as it lets you or your guest change the mic's position as body positions shift throughout the podcast.

Standing up and moving around
If you plan to move around, stand up, perform tasks, or be in multiple locations while recording, then I would recommend using a lavalier microphone, also known as a lapel mic or lav mic like the Rode smartLav+ Lavalier Microphone for Smartphones and Tablets. This type of microphone clips to your clothing around your chest or lower neck area. The small microphone can be plugged into your phone, an audio recording device, or connected to a wireless transmitter that sends the audio signal directly to your camera. Check out the Amazon listing for the appropriate adapter for your phone or device.
The basics of lighting your setup
Lighting plays a major role in the quality of your video. Good lighting doesn't just make you look better, it also gives you more credibility and shows that you really care about your content. Follow these steps to get started with lighting your setup.
Step 1
Find a location you will use for filming, and try to avoid having a window in the background. The window will be overexposed, which will not look great and will also cause the lighting to fluctuate throughout the day. We want to control the lighting.
Step 2
Set up your two lights in front of you at angles similar to the image below. The distance will depend on how strong your lights are, but you could aim for having them 2 to 3 feet away from your face.

Step 3
Start by only lighting your face and turning off all other lights. And incrementally turn each one on in the room and see how it affects the image. Move the lights closer and farther away and see how it affects the overall look.
Consider the following when planning your setup:
If your lighting feels harsh, you can soften it with a diffusion material such as a slightly frosted shower curtain or by turning the lights around and bouncing them off a light-coloured wall.
Overhead lighting, such as ceiling lights, can cast shadows under your eyes, making you look tired.
Keep in mind that light comes in different colours. Ideally, use natural light on your face, like daylight, which measures around 5600 kelvin. Be cautious with indoor lights, as they're often warmer and can make the video look strange.

Warm, overhead lighting vs natural light.
Protip: If you are using autoexposure mode on your camera or phone and you have a physical light in the shot, like a home ceiling lighting for example, the camera will try to average out the exposure of the image, and the bright light will make the camera turn everything else darker. So avoid putting a physical light in the shot when using your phone or an automatic camera mode.
The basics of audio recording
Some people in the video industry say that audio is the most important thing to consider when making videos. Consider the following when planning your setup:
Turn your mic on, put on headphones, and listen for and turn off any noises going on in the background. This could be air conditioners, fridges, fans, or computers. Try your best to minimize these noises or use a different room. Some sound can be removed when editing, but it’s always best not to rely on it.
If you have an echo, then consider adding stuff to your room to minimize the sound wave’s ability to bounce around. Hard, flat walls are the worst for echo, so consider adding couches, blankets, pillows, rugs, and anything soft that will absorb sound. Music studios use a special type of panelling that reduces the audio greatly.
Check your levels to make sure that your audio is not blowing out. This will cause distortion and make it overall bad. This can be viewed on the recording device or after, in the video editor. Simply put, red is bad.

Acoustic Foam Panels
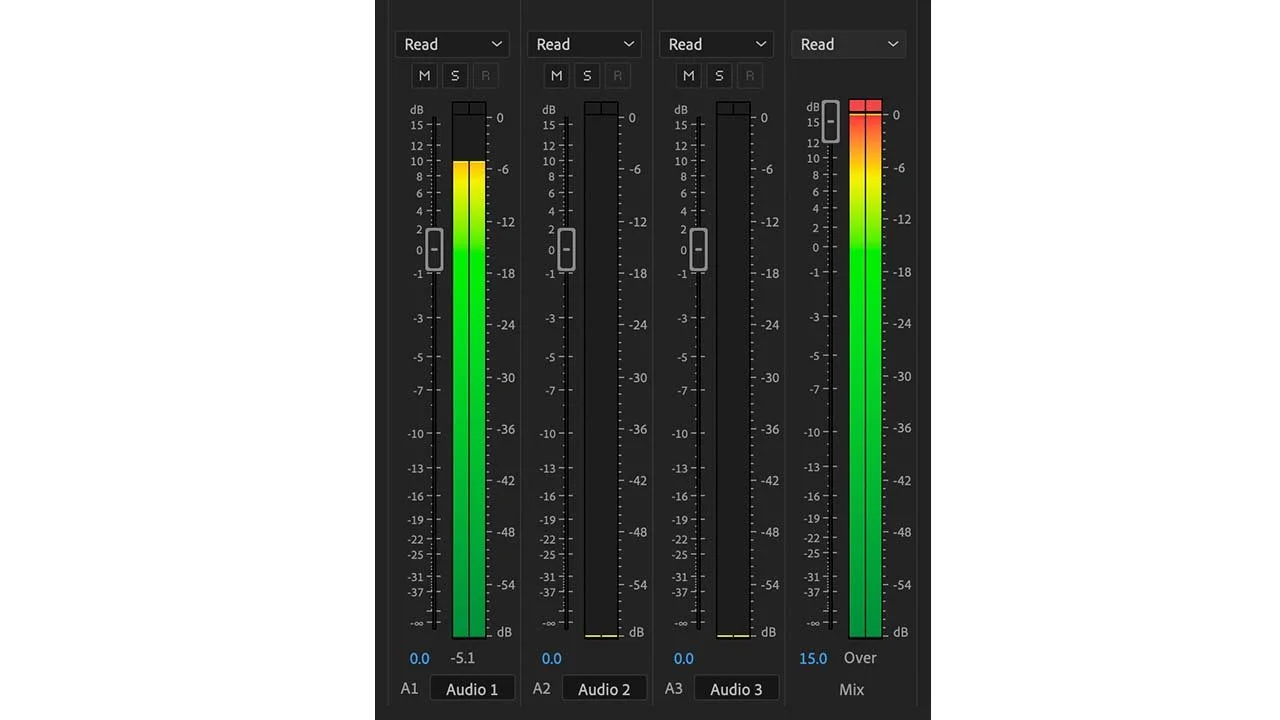
Audio levels
How to film a video
Your equipment is all setup and you are ready to make some content. Don’t worry about everything being perfect, our goal here is just to record a video and incrementally make each one better. Here are the steps and some best practices to follow:
Step 1
Before you start filming, do a test and make sure everything is looking and sounding good. Record 30 or so seconds of you speaking and bring it into the video editor or review it on the camera to make sure everything is a-okay. If you are recording audio on a separate device make sure to check that as well. Protip: if you are using a camera with a flip screen off to the side of the camera, turn it and don’t use it during the recording. You’ll find yourself glancing over at it throughout the video and it will be distracting for the viewers.
Step 2
Now that you’ve done your tests, you are ready to make a video. Press the record button on all devices and say out loud, “Recording“ or if you want to sound like you’re on a movie set say, “Rolling“. And then again, double-check that you are recording.
Step 3
Do your future self a favour and reference what you are filming by saying something like, “This is how to get started with video content, take 1”. Every time you do a new take or restart, mention what you are doing so your future self or your video editor will understand what’s going on because, from my experience, things can get complicated and it’s not always clear.
Step 4
Start creating the content and be sure to include an intro and outro for the video. The intro could be as simple as stating who you are and what makes you knowledgeable on this subject. My intro goes “Hi I’m Wes from Winter Summer Media, and today we’re going to be talking about getting started with video content“. For an outro, you want to encourage action, whether it’s a like, comment or a subscribe. An example of this could be, “If you liked the video, let me know by dropping a like down below, or if you have any questions, I’d be happy to discuss them in the comments”.
Step 5
Stop the recording and immediately backup the video content by transferring it to your computer or an external hard drive for later editing. If you want to be on the safe side, have the content in two places until you have edited the video, and once the video is done and uploaded, delete one of the copies.
How to edit the videos
You are probably busy and don’t have time to spend 8 hours editing a video so the simple answer here is to hire someone online to edit the videos for you. A website like Upwork would be great for that. It’s actually where I first started my career in the video industry. That being said, I would recommend trying to edit the first few videos yourself. It will give you full control over the creative process and will better help you understand what is possible and how you can improve for future videos. If you will be passing this off to a video editor from the start, then I would suggest reviewing the raw footage and giving lots of notes.
Choose a video editing software
If you are on a Mac, then there’s no question that you should start by using iMovie. It’s a beginner-friendly program that will take you a long way. If you want to take it to the next level then consider upgrading to Final Cut Pro X which will set you back around $400-500.
If you are on a Windows, then life is not as simple and you will have multiple options. A beginner-friendly program I would recommend is VideoPad or Filmora. If you’re not afraid of a challenge and a few tutorials, then I would suggest something free and a little more advanced like Davinci Resolve.
My recommendation is to start with a free and simple video editor until you hit a wall when you need a feature that they don’t have. At Winter Summer Media, we use Adobe Premiere Pro because it syncs with the rest of the Adobe suite of programs like Photoshop.
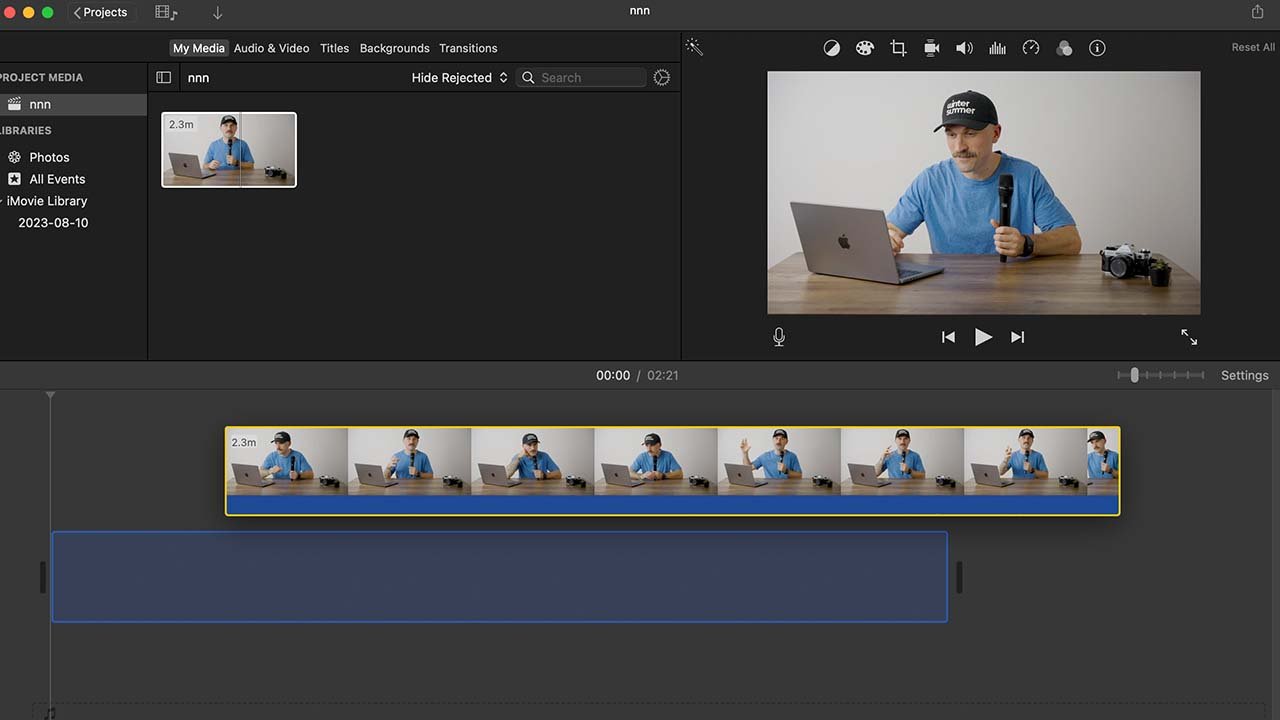
I'll be showcasing the video editing process below using iMovie, but it's worth noting that the majority of video editing software all function the same.
Import your footage and organize
Start by bringing all of your footage and audio files into the program. Most video editors have an 'Import' or 'Media' section where you can drag and drop or locate your files. Once imported, arrange and organize your clips. Some editors allow for 'bins' or folders to keep things neat.

Add your clips to the timeline
Drag your newly imported clips into the timeline below and lay them out in the order you want them to appear. Now you’re ready to start editing your video!
Watch and cut
Press the space bar to play through your clips. Using the cut tool, start by chopping out all of the “definitely not going to use parts“. Keep watching and refining as you go. Try to set a goal for the length of the video. Videos ranging from 2 minutes to 10 minutes are great on YouTube. You could also remove all the “ums” and '“ahs,” but this may add a layer of complexity, as you will see later on.
After you’ve made all your cuts, Watch each one and you may notice a harsh transition between the two clips. Ideally, we want to hide this in some way. One way I do this is by adding other relevant footage or graphics to cover up the cuts. So you not only hide your mistake/cut but also make the video more engaging. If you don’t have other footage, then you have a few options for transitions:
Jump cut: A jump cut is a very common transition style on YouTube. It basically means you don’t do anything and leave it the way it is. Usually, the Youtubers or editors cut the video in a way where everything is quick and they remove all silence and “umms“ and “ahhs“. I would try to avoid this if you want to appear professional.
Fade transition: A bit old school, this transition just fades between the two clips. It works when needed, just don’t overdo it.
Make fewer cuts: The reality here is that if you don’t have a way of hiding the harsh cuts, it may be better to make fewer cuts.
Punch in: This is a bit better than a jump cut, but still not 100% professional. And can definitely be overused. Essentially, you zoom in to the second clip, so when the cut happens, it is “hidden” by the magic of zooming a little bit into the next clip.

Add any text or graphics
Use the "Title" or "Text" tool to add titles, emphasizing text or chapter titles, to the video.

Add music
In order to make the video more engaging, I would suggest adding background music to it. You’ll want to find music that is copyright-free or music that you can get a license to use. Here are a few options for finding music for your videos:

YouTube Audio Library: This is a completely free-to-use library of music from YouTube. It's not the best of the best, but it’s a great resource to get you started creating videos.
The most popular paid options for music are Epidemic Sound, Soundtripe, and Artlist.io. They are all based on a monthly subscription model coming in at around $10 - $30 per month. Another great option to buy individual songs from Audiojungle. You can find a huge collection of copyright-free songs for as low as 2 dollars.
Bring the song into the video editing program and add it underneath your clips. If you’re using it as background music, then you will want to turn the volume down so it doesn’t overpower your voice. I would suggest turning the volume to around -25 dB. You can do this by grabbing the line on the song layer and dragging it downwards.
Export or render your video
Once you're satisfied with your edit, it's time to export. Navigate to the ‘Share‘, 'Export, or 'Render' section in your editor. You may see preset options like YouTube, or if you have to choose, then go with something that looks like:
HD 1920 x 1080 MP4 x264
HD 1920 x 1080 MOV
Make sure to watch the video to check for any rendering errors before posting online.
What platform should you be posting on?
Which platforms you decide to post on will heavily depend on the content you would like to produce as well as your target audience. If I were a tax accountant, for example, and I was starting a Youtube channel to help people with tax questions. I would post 10-minute videos on Youtube and after I got comfortable, I would chop up short clips from those Youtube videos to post on either Tiktok, YouTube shorts or Instagram Reels. If I was using the videos to get new business clients, I would also consider posting short clips to LinkedIn as well.
It’s safe to say that starting with one platform is going to be the best option. Worry about a second platform when you are comfortable and you’ve developed a system for creating videos.
Youtube
YouTube will be the starting place for your video. Upload it there, and you’ll have access to a link that can be used across the internet. Choose between public, unlisted, or private to hide the video while still allowing sharing between selected contacts. While this platform is most popular among individuals aged 15 to 35, its appeal has broadened to include all age groups.
LinkedIn is all about videos these days. So, if you've got a short video that your LinkedIn followers will like, go ahead and post it. Don't worry about the format - LinkedIn can handle both horizontal and vertical videos just fine. The platform predominantly attracts users within the age range of 24 to 35.
Businesses are finding that Facebook has become less effective for posting content due to the sheer volume of videos present. And given the attention spans of people today, only highly engaging ads or viral clips truly succeed on the platform. However, posting on Facebook may still provide value. Similar to LinkedIn, Facebook accommodates both horizontal and vertical video formats. The bulk of the user base falls within the 24-35 age bracket.
Instagram reels, YouTube shorts, and Tiktok
These platforms are the home of short-form vertical videos. Here, you have the flexibility to post videos ranging from a quick 10 seconds up to a full 10 minutes. The real charm of these platforms lies in their potential for virality - anyone and any content can suddenly become a viral hit. So it’s a great time to post a wide range of content. Most people using these platforms are between 18 and 34 years old.
Instagram and Facebook stories
Stories are videos that are posted and disappear after 24 hours. This format offers a perfect space for sharing more informal or 'behind-the-scenes' content, and updates, and even promoting more impactful content hosted on other platforms. The bulk of the user base for stories lies within the 24-35 age bracket.
The second most important thing you need to know
Keep in mind that you might not see immediate results and might feel like you’re wasting your time. Push through this feeling, because many people tend to quit here. Mr. Beast, one of the biggest content creators, even mentioned making 100 videos before deciding anything. He admitted his early videos weren't great and suggested focusing on one improvement with each new video. The key is to keep making videos consistently. Set a schedule, aim for those 100 videos, and don't give up until you reach it.
Once you create your first Youtube or social media video, drop a link in the comments below and I’ll give you first like and comment.